Nail Trimming
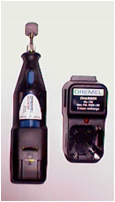
Equipment needed: Nail trimmers and Kwik-Stop®
Dog’s nails or claws are meant to be long. In wild canids they are used as tools for digging, ripping, gripping and fighting. In the domesticated dog these functions are no longer useful and long nails lead to problems such as damaging the home environment, causing injury to people, broken nails resulting in bleeding and trouble walking on hard surfaces. When a dog’s nails become too long they interfere with the dog’s gait and as the nails continue to grow, walking will become awkward and painful. In severe cases a dog’s nails can curl under and grow into the pad of the dog’s paw causing a very serious and painful infection. These types of ingrown nail problems are most common on the dewclaws. Nail trimming needs to be done frequently and on a regular basis both to keep the nails short and to maintain the dog’s training concerning nail trimming. Cutting longer nails is more uncomfortable to the dog and it is much easier to “quick” a dog or cut into the tender section of the nail when the nails are long. I recommend trimming the nails every 2-4 weeks for most dogs. If you let your dog’s nails grow too long then it could take some time to get them back to a healthy length again. Regularly trimming the tips of your dog’s nails is the best approach. Some dogs walk and run on rough surfaces and are able to wear down their nails, but most dogs will need some help. You will get to know how fast your dog’s nails grow if you routinely inspect your pet’s nails. Even if you don’t actually trim them each time, regular inspection will help assure that your dog’s feet stay healthy. So, make nail inspection and trimming an important part of your dog’s routine grooming.
TRAINING SUGGESTIONS
- Dog nail trimming is not painful if you use a sharp nail trimmer and don’t clip the nails too short. A dull trimmer can put a lot of pressure on your dog’s toenail before it actually cuts through the nail. If this happens your dog may feel an uncomfortable pinching sensation. This is because the vein in the toenail is being squeezed. To avoid this always make sure that you’re using a sharp pet nail trimmer.
- There is no law requiring all four feet to be trimmed at the same time. If your dog only tolerates one foot then do one foot. It is better to end the session on a positive note than to end up with a wrestling match.
- Bring out the clipping tools ahead of time and let your dog become familiar with them. It is important that you remain calm and confident. If you’re nervous, your dog will sense it and associate fear or uncertainty with the nail trimming. If your dog is nervous use gentle reassurance, but don’t “baby” your dog. Let your dog know that you expect him to behave, but don’t push it too far.
- Many dogs may never like to get their nails trimmed, but if done regularly over time, dogs can learn to sit through this routine grooming procedure. Other dogs may never sit still. If you can’t get your dog to sit still you may need to recruit the help of another person to hold your dog while you trim their nails. While some dogs can be distracted by dog treats alone, others may also have to be held. You may want to try clipping your dog’s nails after a full day of exercise when your dog is looking to take a long nap. Tired dogs tend to be less resistant.
- It is useful with puppies to start handling their feet daily and practice various restraint techniques. Start nail trimming early and often.
- I use positive reinforcement with food treats during nail trimming. I would use special treats that are only used for nail trimming and nothing else. Keep plenty of dog treats on hand to reward good behavior. You can also use dog treats to distract your pet during dog nail trimming. Treats work great to draw a dog’s attention away from a bleeding nail.
- I like to use Millers Forge® nail trimmers which are shown above. These are side cutting and very easy to use. They also allow you to see where the cut will be made better. The blades stay sharper long but cannot be replaced. I have re-sharpened them. This type of nail trimmer also allows me to make finer cuts with better control so I don’t have to try to clip the nail perfect with the first cut. I also find the dogs tolerate this type of trimmer better than the Resco® or guillotine-type nail trimmer.
- I find if I bend the foot back and cut from behind the dog tolerates the procedure much better. I also try to keep the leg in a natural position instead of twisting it sideways or in extreme flexion or extension.
- I always have Kwik-Stop® which is a styptic powder available because you will “nick” them now and again.
- I often trim the nail tip in a perpendicular direction to blunt the tip of the nail.
- Lastly I try to use a file or coarse sandpaper to file off the sharp edges that remain from the trimming.
What is the “quick”?
The quick is the living part of a dog’s nail and has blood vessels and nerves running throughout. Cutting into the quick during dog nail trimming is painful for your dog and will result in bleeding. If your dog has light colored nails your job will be easier since you will be able to see the quick which appears as a pink area within the light colored nail. It will be impossible to see the quick if your dog’s nails are black or dark in color. If your dog has at least one light colored nail you can usually use that nail as a guide for the others. If dog nail trimming is completely new to you, ask your veterinarian or groomer to show you how to trim your dog’s nails or consult a good dog care book. It is also important to note is that the quick grows with the nail. As a dog’s nails grow longer the quick will also lengthen. So if your dog’s nails are over grown you will not be able to clip the nails to the desired length without cutting into the quick. You will need to trim the tips of your dog’s nails often and over time the quick will recede. To avoid cutting into the quick you’ll want to start by trimming small pieces of the nail until you get the hang of it.
Trimming your dog’s nails is one of the regular home dog grooming tasks that helps to keep your dog healthy and active. It also saves wear and tear on the floors and furniture. As with most dog grooming tasks, rewarding your dog for positive behavior is an important part in your dog’s acceptance of the activity. It’s worth it to make sure nail trimming is a positive experience for your dog – we never want it to become a battleground where your dog or you can be injured. Learning to become confident in proper dog nail trimming, training your dog with positive feedback, and showing patience as well as spending time with your dog will be a reward in itself.


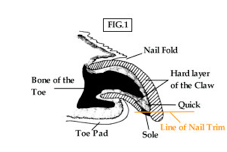
Figure 1.
This figure depicts some of the normal anatomy of the end of the toe. The quick actually is the dermis or subcutaneous tissue fo the nail – it is also called the corium. This layer has a rich blood and nerve supply which explains the bleeding that occurs when this layer is cut with nail trimmers. The epidermis of the skin has been modified in this area into a hard horny layer which is the wall of the nail. The sole is a layer of epidermis similar to the wall of the nail but softer. It is located on the bottom of the nail. The red line shows the proposed nail trim cut which avoids the quick.
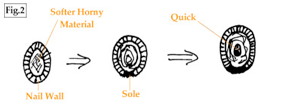
Figure 2.
Here we are looking at the tip of the nail which is fairly easy to do when the foot is flexed back. As you cut the tip of the nail the outside walls of the nail are visible against the softer sole material which it encircles. As you approach the quick a dark center dot much like a bull’s eye begins to show up. This is the tip of the quick and when this is seen it is time to stop the nail trimming procedure. Continuing to cut the nail after reaching this point will result in bleeding.


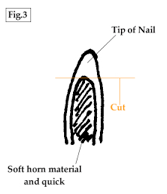
Figure 3.
Fig. 3 is showing the underside of the claw. The hard outer layer of the claw covers the softer horn material and the quick of the corium. By cutting the nail just in front of the softer inner layer the quick can be avoided.